HOW TO RIG A PAPER IN MAYA FOR ANIMATION
FROM WHERE TO GET MAYA?
You can get Maya 2022 from autodesk website if you are a teacher or a student then you can get it free of cost by autodesk educational access and then you can do the rigging.
WHAT IS RIGGING ?
Rigging is basically a process of adding joints in your 3d model, while do the rigging you also need to take care of the hierarchy, actually hierarchy is the most important thing in rigging because if we messed up with hierarchy then the child joint is not going to move with the parent joint and the rig become wrong.
HOW TO DO THE RIGGING ?
First open Maya 2022 then click on "CREATE > NURBS PRIMITIVE > PLANE" click on the check box not directly on the plane.

Then this dialog box is going to appear in front of you

Axis is in which axis you want your plane and you can manually set width and length of your plane and the patches is number of division horizontally and vertically, you can set according to yourself then click on apply or create and a plane is going to appear in front of you.

By holding right click you got this menu then select control vertex and you can see how many vertex the plane have, and then again hold right click and go to object mode to hide the vertex.
Then select "FX" option on top left corner

Then click on "nHair > create Hair" remember to click on the box

Then this dialog box is going to appear in front of you select output to NURBS curves

in our case number of division in V direction is 7 that's why I putted 7 there and in case of U direction the division is one but i put 2 so the paper is getting more smoother, these numbers are basically number of joint we want to add and then click on "Create Hair"
Then something like that is going to come on your screen

then open the Create Hair again and instead of 2 in U put 1 and then click on "Create Hair" so that you can get hair in the middle also now we need the add hair on the 4 corners so for that "SELECT PLANE > HOLD RIGHT CLICK > CONTROL VERTEX " by holding "SHIFT" select all 4 vertex open "CREATE HAIR " then click on "AT SELECTED SURFACE POINTS/FACES"


Then click on "Create Hairs"
Then select these 3 and press "DELETE" key


Then switch to "Rigging" tab in top left corner

Then click on "SKELETON > CREATE JOINTS" and click on the grid or somewhere to create the joint.


Then select the cursor icon then select the Joint and press "CTRL+D" to duplicate it duplicate it, duplicate it that much so that they match with the nurbsplaneFollicle numbers and then select one joint and with CTRL select the first nurbsPlane1Follicle and press "P" to parent it.

Do the same thing for all of them, then select all the joint and make X, Y, Z translate "0" so that the joints set automatically to their position and reduce their radius a little bit.

Then by selecting all the joints press "CTRL + D" and then press "SHIFT + P" so the joints getting duplicated and the duplicated version become unparent, then increase the radius of the joints which we duplicated by a little and then select all the duplicated joints and select the plane and then under "Skin tab" select "BIND SKIN" option.
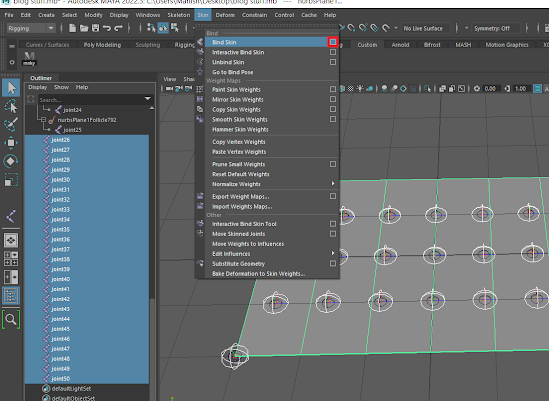
Click on the check box then select Bind to "selected joint" and click apply and close


Then go to Curves/Surfaces tab and create a circle and then select first 3 joints and select curve and then parent the joints to curve by pressing "P" so that when you select the curve the joints automatically getting selected.

Do the same thing for the middle and last one, depends completely on you that how much control points you want to add.
Then in the end make one more curve and parent all the controller point and remaining unparent joints you have so that you can move all the things at a time, by selecting all the previous curve points and select the joint which we duplicated and unparented if anyone is left and then select the bigger curve and then press "P" to parent them, and now your rig is ready for the animation.


Now you can use this rig for the animation, to hide the control points and joints, select the plane the click on this icon.

If you have any doubt then let us know in the comment box.
If you also want to know how to animate then read our previous blog
If you like our effort do join us on social media handles
Instagram :- https://www.instagram.com/shadyarts4/
Twitter :- https://twitter.com/timezon70403223
Support us here :- https://www.buymeacoffee.com/manichakradhari


Comments
Post a Comment